Why Pressure Test?
When construction or repair of a refrigeration system is complete, it is standard procedure to perform a Pressure Test. Pressure Testing describes the practice of pneumatically testing the piping and components of the system by adding a test fluid until the desired test pressure is met.
The reason a Pressure Test is done is to ensure there are no leaks in the system before the vacuum is pulled, and the refrigerant is charged. In this article I will cover important practices for Pressure Testing, as it applies to different sizes and types of refrigeration systems.
Best Practices & Considerations
The upper bounds of your test will be determined by the Maximum Operating Pressure of the refrigeration system you are testing. The two pieces of information you need to determine this are the Refrigerant Type for the system, and the Saturated Condensing Temperature (SCT) the system is intended to operate at. (1.25)x(Max Operating Pressure (MOP)) is common practice for testing refrigeration systems, aligning with specifications from ASME (American Society of Mechanical Engineers), TSSA (Technical Standards and Safety Authority) and CSA (Canadian Standards Association).
ASME are American standards which are internationally accepted and specified, while TSSA and CSA standards are relative to my work area of Toronto, Canada. Refrigeration Systems in this area are constructed, repaired, and tested as per CSA B52 Mechanical Code, and have systems field inspected by TSSA when required. PSIG (Pounds Per Square Inch Gauge) is the commonly used pressure increment in this region, so these are the units I will use throughout the rest of this article.
Note: the industry also uses kPa (kilopascal) (6.895kPa = 1 PSI), as well as Bar on CO2 systems due to their high pressures (14.5PSI = 1 Bar).
Nitrogen
The testing fluid most appropriate is Nitrogen (atomic number N7). Most of the air that we breathe is nitrogen: air’s composition can be seen below.
Note: it is never advisable to hydrostatically test a refrigeration system using water.

The industry uses “Food Grade” Nitrogen for Refrigeration System Pressure Testing: it is clean of contaminants, and most importantly, very low in moisture content.
Note: Medical Grade Nitrogen goes a step further, being extremely dry. Moving on to the format of Nitrogen and getting it into the system, the next image below is from Josef Gas, and shows us the different nitrogen bottle sizes available on the market.
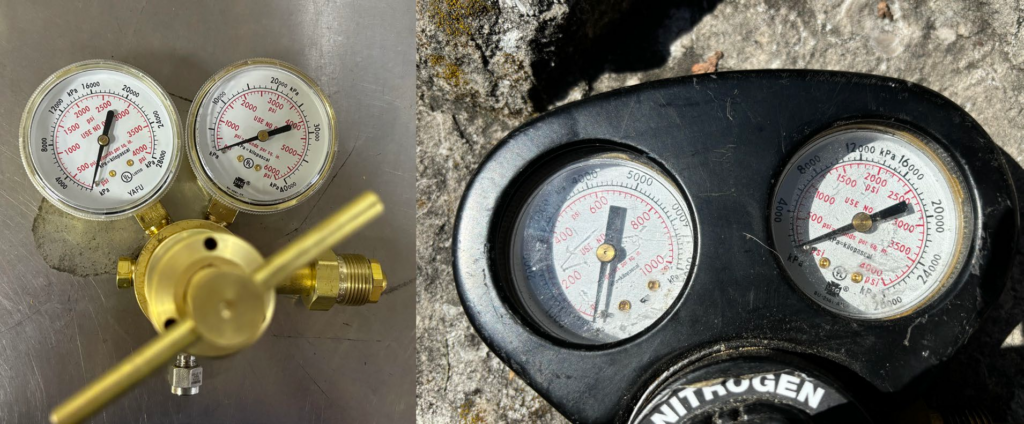
The bottle, or “Bulk Pack” (16 Nitrogen bottles tied together in parallel with a common outlet) is then connected to a Nitrogen Regulator. There are Standard Nitrogen Regulators, and High Pressure Nitrogen Regulators.
Their difference is a max regulator inlet pressure (from the Nitrogen Bottle) of 4000PSIG, or 6000PSIG (see image above). Respectively, they also have different Delivery Pressures available on the outlet side of the regulator (to the system), represented on their gauge. These 2 classes of regulators have different thread patterns on them, to avoid the possibility of connecting a Standard Regulator to a High Pressure Bottle (or Bulk Pack) where a failure would occur.

Small Refrigeration Systems
Starting with Small Refrigeration Systems, we will categorize this as anything under “3 tons or less of refrigeration, or 5 tons or less of Air conditioning” – as per ORAC (Ontario Refrigeration & Air Conditioning, paragraph 3 of this webpage on brazing). It is stated here that a TSSA Inspection/Pressure Test Witness is not required below these system capacities.
For Small Systems, consider the piping and components all being in a local area. This would include:
- Roof Top Units
- Split systems of any type: Furnace, Ductless Split, Window Shaker (so long as they do not have very long piping runs)
- Appliances (Fridges/Freezers of any type)
- Self Contained Units (Absorption Systems, Heat Recovery Systems, Heat Pumps)
- Small Critically Charged Freezers and Coolers.
Note: Chillers straddle between a Small and Large System, as their Refrigeration System is contained within one area, but is however large capacity, well above the ORAC tonnages stated.
Pressure Testing a Small System is usually a straightforward, simple procedure (see image below of a Ductless Split). If all system components and piping can be accessed in one or two areas, it simplifies the process/time taken of leak checking and completing a Pressure Test. Not having to schedule TSSA for inspection(s) also makes the install or system repair easier to plan and schedule.
A popular residential air conditioning refrigerant is R134a, and a common operating point for it is 120f Saturated Condensing Temperature (SCT). The SCT is the basis of the highest temperature, and pressure realized in a system. To find the pressure related to this Saturated Temperature, utilize a Pressure Temperature Chart (such as Bitzer Refrigerant Ruler):
- Take your SCT of 120f to the Pressure Temperature Chart
- Find the “Saturated Condensing Pressure” of 171.1PSIG.
- Following the previously mentioned equation: (1.25)x(MOP), we get (1.25)x(171.1PSIG) = 213.875PSIG. Round this to 214PSIG.
So, 214PSIG is the max pressure we can achieve during testing. This is commonly rounded up to 225PSIG or 250PSIG for this refrigerant, as this is still well below max pressure ratings for most components. Be wary of exceeding pressure ratings of low side components however, such as a Low Pressure Cut-Out (LPCO). If low side components have lower pressure ratings than the intended max test pressure, it may be necessary to isolate the high side from the low side of the system and run two separate tests.
Test Plan for a Small System
For a system of this size, here is a plan to follow for Pressure Testing. This example is for a system which is “Flat” (empty / 0PSIG). We will use 250PSIG as our Final Test Pressure.
- Ensure all system valves are open. Ensure safety glasses are worn.
- Add nitrogen to achieve 50% of the Final Test Pressure: 125PSIG. This can be done by connecting the nitrogen bottle to a regulator, and attaching the regulator to a refrigeration manifold which is connected to the system. Alternatively, the nitrogen bottle/regulator can be connected directly to the system (with an isolation valve in between), and a pressure gauge (preferably digital, for accuracy) attached directly to the system.
- Quickly check the indoor unit/piping by listening (you can hear leaks at this pressure if the work area is quiet), and soap test using a Non-Corrosive Soap such as Big Blu. Ensure to soap more common leak points e.g schrader valves/caps, and flare connections.
- Quickly check the outdoor unit/piping with the same considerations as above. Ensure that all gauges/fittings/hoses that you are using for the pressure test are also soap tested.
- If no leaks are found, you are ready to bump up to your final test pressure. Note: it is good practice to perform your first soap/leak check at this lower pressure to start. If nothing else, this would save Nitrogen in the case that you find a leak at the initial lower pressure (this would also save a considerable amount of time on a Large System).
- Increase the system pressure to 250PSIG and start a timer for 1 hour. More time under test is preferred, (more on this later) but 1 hour is common practice, as this allows you to begin Evacuation sooner. Note: your “Vacuum Test” and “Decay Test” will add further certainty that your system is free from leaks.
- Thoroughly check the indoor unit/piping by listening, and soap testing everything: all piping and component connection points of any kind. An Inspection Mirror and Flashlight are a great help to be efficient and confident. You are looking to see if any soap is growing bubbles, i.e a “Beard”. Very small leaks may need to be realized after the soap has sat on the leak for 15 minutes or more. As they say, no bubbles, no troubles.
- Thoroughly check the outdoor unit with the same considerations as above. Again, ensure that all gauges/fittings/hoses that you are using for the pressure test are also soap tested.
- If no leaks are found, and the gauge has maintained 250PSIG, the pressure can now be blown off the system. Note: to release the pressure slowly whenever possible to avoid noise. If no one else is within earshot and you would like to blow the pressure off quicker: ensure the blow off point is stable (the hose is not loose) and wear appropriate hearing protection.
- If evacuation is your next step, you want to time the end of your nitrogen blow down so that you have about 1-2PSIG remaining in your system and begin to pull the vacuum at this time. Note: If you blow a system down to 0PSIG, air will make its way back into the system through the open port. Just by adding and removing nitrogen, you have already removed a large volume of air from your system.
- If you will not evacuate until later, blow down your system to 10-20PSIG. This is a common Safe Holding Charge Pressure, which keeps the system positive so that air does not enter the system.

Large Systems
Large Systems will be greater than 3 tons of refrigeration, or 5 tons air conditioning. I will forego categorizing “Medium” Systems for conciseness. A Large System’s physical size/layout comes down to there being multiple locations which require inspection during the pressure test. There can be multiple people, and multiple hours or days put into pressure testing a Large System.
The pressure testing may be done in multiple “Phases” during construction, as main portions of the systems are completed. Access to roofs, penthouses, valve stations, interstitial spaces, engine rooms, high ceiling hung evaporators and other components may be required. Use of scissor lifts, boom lifts, and ladders are also common to access all points to be soap tested. Large System types include:
- Supermarkets
- Ice Rinks
- Industrial Food Process Plants
- Cold Storage Plants
- Mining Refrigeration Systems
- Commercial Heat Pumps and Heat Recovery Systems
Note that Large Homes also fall into this category if their system tonnage requires TSSA Inspection. Homes can have quite complex VRF Systems (Variable Refrigerant Flow) in them, tied into a home automation system much like a commercial Building Automation System (BAS).

TSSA Procedures for Large Systems
To ensure a system is leak free, a similar process is followed for a Small System or Large System. There are however many planning considerations which are unique to systems which require TSSA inspection. This is true in service/repair applications, but I will focus on new construction in this section for simplicity. Note: TSSA Inspections have extremely variable degrees of leniency or strictness, so I will list best practices below.
- Material must be ordered, received, and inspected in accordance with required Material Specifications. Canadian Registration Numbers, Mill Test Reports, Data Reports, and Material Designations which match paperwork must be clearly stenciled/ stamped onto piping and fittings from the manufacturers, and circled or confirmed by the person who receives it on site. This is a required QC (Quality Control) Process.
- TSSA will visit a very large project up to three times for a single “Phase” of the project. This includes a “Pre-Pipe Inspection,” another visit to confirm procedures are followed during construction, and a final visit for the TSSA Inspector (or person authorized on their behalf) to witness the Final Pressure Test.
- These above considerations require planning ahead for material order and receival, as well as completion dates for significant sections of the project. Organization of material, and its paperwork is paramount to being successful in a TSSA Inspection, on top of completing a successful Pressure Test.
Pressure Testing Differences for Large Systems
There are some things which are unique to testing Large Systems compared to a Small System. These are both procedural, and to ensure inspection requirements are met. Here are the points unique to Large Systems:
- The Final Test Pressure must remain below 10% of any Relief Valve which will be part of the Pressure Test. Relief Valves may open 10% above or below their rated pressure. Another less preferred practice is removal of Relief Valves from the system until the Pressure Test is completed.
- The test gauge must be calibrated (annually), and the Certificate of Calibration must be on-hand.
- Nitrogen Bulk Packs may be used. A Bulk Pack is 16 Nitrogen bottles tied together in parallel with a common outlet. Each bottle still has its own handle, which allows the Refrigeration Mechanic to strategically open/close individual bottles, depending on his strategy to optimize pressure delivery to the system. This can be a bit nuanced, so I will not go into detail.
- High Pressure Nitrogen Bottles (or High Pressure Bulk Packs) may be used instead of standard pressure nitrogen. For ammonia systems, high pressure bulk packs are used for fast/efficient delivery of nitrogen to the system: ammonia (R-717) refrigeration systems are only tested to 250PSIG. For CO2 Systems, High Pressure Nitrogen bottles/Bulk Packs are used due to the high operating pressures, therefore required high test pressures well over 1000PSIG for a Transcritical system. Ensure that you have a High Pressure Nitrogen Regulator on hand for use with these Nitrogen Bottles or Bulk Packs.
- Large diesel or gas air compressors may be used in ammonia systems to get the initial test pressure up to around 110PSIG where the Air Compressor will max-out in increasing pressure. If at this pressure the first soap test and inspection show no leaks, the pressure will be bumped up with a high pressure bulk pack to its Final Test Pressure. The downside of this method is that air is added to the system. This is a trade-off of cost of the test fluid (compressor rental is cheaper than buying nitrogen), to adding moisture to the system. This partial use of air to test will cause a longer evacuation time, with more vacuum pump oil changes. Note: it is common to evacuate systems of this type for multiple days, at multiple locations before charging.
- A small leak on a Small System should be found within 1 hour. A small leak on a Large System would have no, or virtually no affect on the gauge over 1 hour. This is why a test time of 24 hours is more suitable. The 24 hour test time is also required by TSSA.
- Ambient Temperature of the Test Gauge location must be measured at time the 24 hour test period begins. If this is in the afternoon and the Test Gauge is outside, the next morning the gauge pressure could be lower, and then rise again the next day back to the Final Test Pressure as the outdoors warms up. This is due to the Temperature Pressure Relationship of Nitrogen gas. Note: Nitrogen is more stable than air in this respect, as its pressure is less influenced by temperature change compared to air. The HVAC School Application’s “Nitrogen Pressure” Tool (see final image) is a great way to be confident with a pressure drop overnight if ambient conditions have cooled down. You can enter starting pressure/temperature, then enter the new temperature from next day to see what your pressure should be. You may realize you have a leak you did not find, or that the pressure drop is indeed relative to the drop in temperature.

Conclusion
Pressure Testing is an important part of both service/repair work, and new construction of Refrigeration Systems. In premise it is a relatively simple process, but knowledge and practice will improve your efficiency and skill in accomplishing a successful test. I will follow this article up with an article on evacuating, and another on charging.

Whether you require installation, repair, or maintenance, our technicians will assist you with top-quality service at any time of the day or night. Take comfort in knowing your indoor air quality is the best it can be with MOE heating & cooling services Ontario's solution for heating, air conditioning, and ventilation that’s cooler than the rest.
Contact us to schedule a visit. Our qualified team of technicians, are always ready to help you and guide you for heating and cooling issues. Weather you want to replace an old furnace or install a brand new air conditioner, we are here to help you. Our main office is at Kitchener but we can service most of Ontario's cities
Source link
Add Comment