At HVAC.com, our writers create options that put you in charge of your HVAC system. Our product evaluations and proposals are researched and backed by actual patrons and business consultants, not dictated by our companions.
Purchased a brand new thermostat and questioning in case you can set up it your self? For some, thermostat wiring is a DIY job, however we gained’t blame you in case you go for an area professional to deal with the work.
We’ll provide you with all the data you could efficiently set up your new thermostat beneath. Plus, we’ll clarify the thermostat coloration code.
Earlier than you get began, be sure to have all of the instruments you could full the duty. To put in a thermostat, you’ll require:
In case your new thermostat is a special form and dimension than your current one, you may additionally want spackle to patch holes and paint to match your present wall coloration. When you don’t have any leftover wall paint, have your wall coloration matched on the paint retailer earlier than you start.
Preserve your cellphone close by. Its digital camera will turn out to be useful when you get began.
Easy methods to set up a thermostat
1. Flip the facility off
Go to your breaker field and swap off the facility to your HVAC system, together with the thermostat.
2. Take away the present thermostat
Detach the duvet by gently pulling it away from the bottom. If it doesn’t come off simply, test if there’s a screw or latch to launch it.
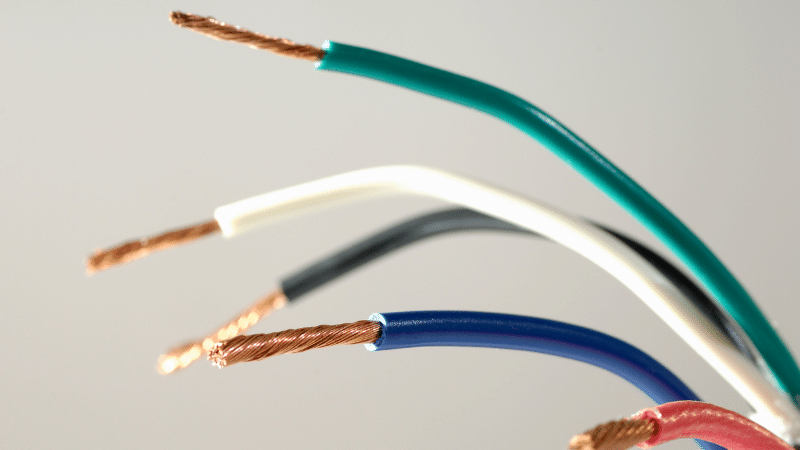
You will notice a number of colourful wires inserted into terminals. Use your cellphone to {photograph} the thermostat wiring. Doing so will allow you to keep in mind which wire goes during which terminal. Alternatively, some new thermostats include stickers to label the wires. (See our thermostat coloration code chart beneath to study extra about every wire’s goal.)
When you’ve recorded your thermostat wiring, disconnect every wire from its terminal. You’ll seemingly must loosen every terminal screw to free the wiring. Subsequent, take away the screws holding the thermostat base to the wall.
Rigorously take the thermostat base off the wall. Maintain the wires securely whereas doing this, in order that they don’t slip into the wall.
In case your thermostat is greater than 20 years previous, it could include mercury. Don’t simply throw it away. Observe the mercury disposal tips on your space.
3. Discover the frequent wire
The frequent wire is also called the C-wire as a result of it connects to the C terminal of the thermostat. It’s typically blue, however it could even be brown, black, or purple.
The frequent wire is important for contemporary thermostats – particularly good and programmable thermostats. Your previous thermostat won’t have used the frequent wire.
When you don’t see the frequent wire, look inside the outlet the place the opposite thermostat wiring is popping out. Rigorously pull out any wires you discover tucked contained in the wall.
When you nonetheless can’t discover it, contact an HVAC technician for assist. Or select a thermostat mannequin that doesn’t require one.
4. Restore the wall
Now could be the right time to repair your wall. Make sure the thermostat wiring is safe by taping or clamping the wires collectively – you don’t need them to slip again into the wall.
Fill any holes your previous thermostat left behind with spackle. Contact up the wall together with your present paint coloration.
Depart the outlet with the thermostat wires open. Look forward to the spackle and paint to dry earlier than shifting on to the following step.
5. Set up your new thermostat
Place your new thermostat’s backplate on the wall. Be sure that it’s degree, and screw it into place. If it requires drywall anchors, use a drill to make your holes prematurely.
Utilizing a wire stripper, guarantee about ⅜-inch of the wire is uncovered. Then insert every wire into the corresponding terminal, referring to the picture you took or the labels you positioned earlier.
When you insert the wires, tighten the terminal screws. Connect the thermostat’s faceplate.
6. Flip the facility on and full the set up
Flip the facility again on at your breaker field.
Full the set up directions on your particular thermostat mannequin. For good thermostat set up, that may seemingly embody connecting to your private home WiFi community.
Programming the thermostat is the ultimate step. You’ll want some technical understanding to finish this portion, and we advocate following your set up handbook step-by-step. If the programming isn’t accomplished efficiently, your system gained’t function optimally.
Sound like an excessive amount of work? Rent one among our licensed HVAC professionals to put in your thermostat.
Thermostat coloration code
Typically, thermostat wires have a common goal. Every coloration normally corresponds with the identical terminal whatever the thermostat mannequin.
There are occasional outliers. However for probably the most half, HVAC methods use the thermostat coloration code beneath.
| Wire coloration | Function | Terminal |
|---|---|---|
Crimson | Energy | Rc and Rh |
Orange | Warmth pump | O |
Yellow | Cooling | Y |
Inexperienced | Fan | G |
Blue | Frequent | C |
| White | Warmth | W |
In case your thermostat controls each your heating and cooling methods (e.g., your air conditioner and furnace), you’ll have two crimson wires. The Rc terminal connects to the cooling system, and the Rh terminal connects to the heating system.
Relying in your distinctive HVAC system, you won’t have all of those wires.
Thermostat wiring: the underside line
Putting in a thermostat is a DIY job that requires some fundamental data and instruments. If wires aren’t how you favor to spend a Saturday afternoon (and we definitely don’t blame you), rent an HVAC skilled to deal with your thermostat set up.
Join with a professional now.
Whether you require installation, repair, or maintenance, our technicians will assist you with top-quality service at any time of the day or night. Take comfort in knowing your indoor air quality is the best it can be with MOE heating & cooling services Ontario's solution for heating, air conditioning, and ventilation that’s cooler than the rest.
Contact us to schedule a visit. Our qualified team of technicians, are always ready to help you and guide you for heating and cooling issues. Weather you want to replace an old furnace or install a brand new air conditioner, we are here to help you. Our main office is at Kitchener but we can service most of Ontario's cities
Supply hyperlink
Add Comment