Why a Water Filtration System Install Is Worth Doing Right
A water filtration system install is one of the most impactful home upgrades you can make for your family’s health and comfort. Clean water at every tap means better drinking water, longer-lasting appliances, and healthier skin and hair.
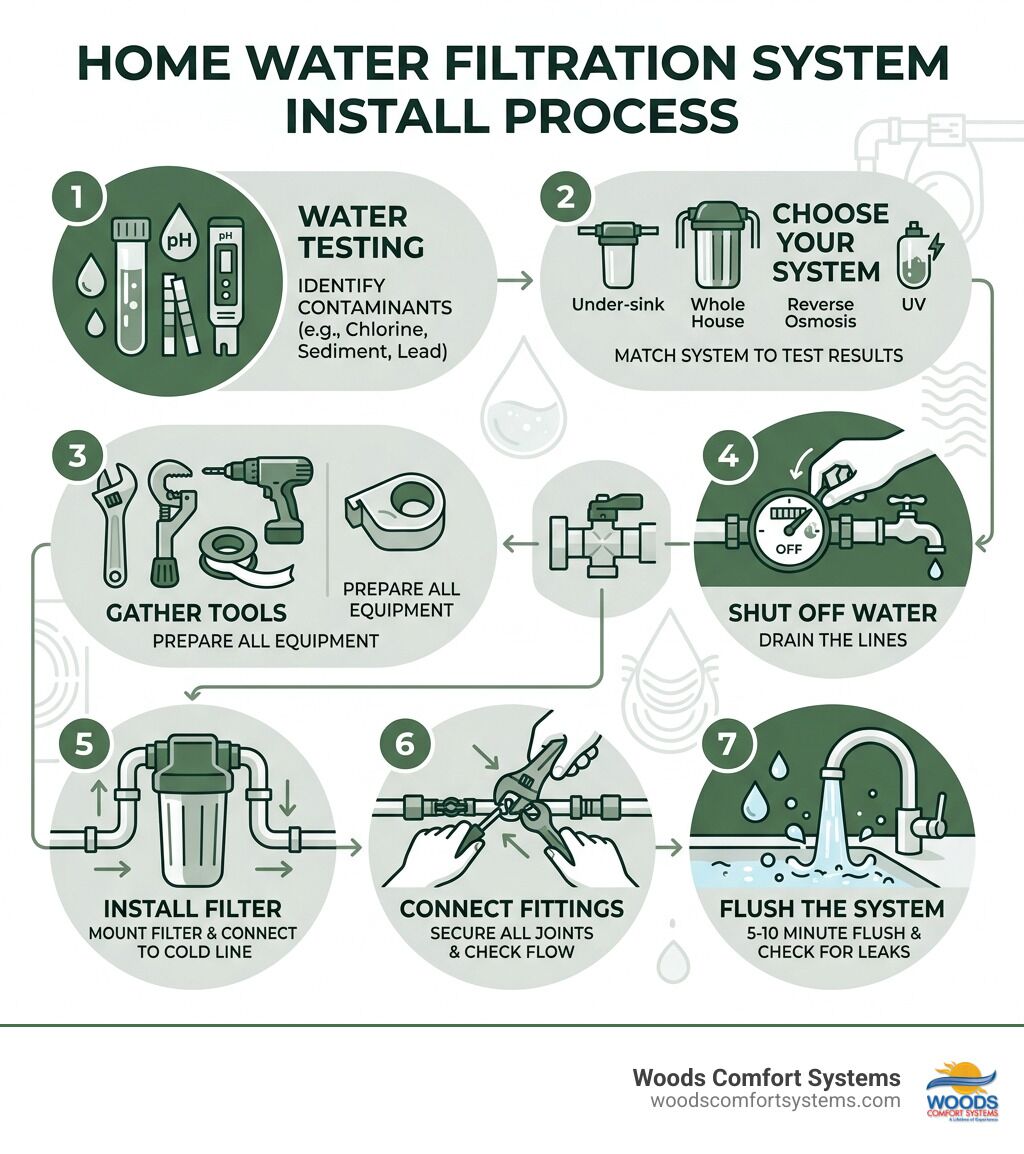
Here’s a quick overview of how to install a water filtration system:
- Test your water to identify contaminants (chlorine, sediment, lead, bacteria, etc.)
- Choose your system – under-sink, whole house, reverse osmosis, or UV filter
- Gather tools – pipe cutter, Teflon tape, adjustable wrench, drill, and shut-off valves
- Shut off the main water supply and drain the lines
- Install the filter at the correct location on your cold water line
- Connect all fittings and tubing, checking flow direction
- Flush the system for 5-10 minutes and check for leaks
Most under-sink systems take 1-2 hours for a confident DIYer. Whole house systems take 2-4 hours and require intermediate plumbing skills.
Over 40% of U.S. households already use some form of water filtration – and for good reason. Municipal water meets basic safety standards, but it can still carry chlorine, sediment, and trace contaminants that affect taste, odor, and long-term health. Well water users face additional risks like bacteria, iron, and hardness minerals that can stain fixtures and damage plumbing over time.
The good news? Many water filtration systems are designed with DIY installation in mind. With the right preparation and a few common tools, you can get clean water flowing throughout your home without calling a plumber.
I’m Chris Woods, owner of Woods Comfort Systems, a third-generation home comfort company serving Central Texas since 1956 – and water filtration system install projects are part of the whole-home wellness solutions we help homeowners navigate every day. Whether you’re tackling this yourself or want expert guidance, this guide gives you everything you need to get it done right.
Choosing the Right Water Filtration System Install for Your Home
Selecting the right system is the first hurdle. In Central Texas, from the limestone-heavy water of San Marcos to the municipal supplies in Austin and San Antonio, the “best” system depends entirely on your water source and what you want to remove.
Understanding Your Water Source
If you are on city water, your primary concerns are likely chlorine, chloramines, and fluoride. These are added for safety but can leave a chemical taste and dry out your skin. If you are on a private well in areas like Wimberley or Kyle, you might be dealing with bacteria, nitrates, or heavy sediment. Understanding how water gets contaminated is vital before you spend a dime on hardware.
Common Filtration Technologies
- Carbon Filtration: The workhorse of the industry. Activated carbon uses chemical absorption to trap contaminants. One pound of activated carbon actually has a surface area of about 100 acres! It is excellent for removing chlorine and improving taste.
- Reverse Osmosis (RO): This system uses household water pressure (typically 50-60 PSI) to push water through a semipermeable membrane. It’s incredibly effective at removing dissolved inorganic solids like lead and arsenic.
- Ion Exchange: Primarily used in water softeners, this process swaps “hard” minerals like calcium and magnesium for sodium or potassium ions.
- UV Filtration: A must-have for well users, UV light kills 99.9% of harmful pathogens, including E. coli and Giardia, without adding chemicals to your water.

Whole House vs. Point-of-Use
When planning your water filtration system install, you need to decide if you want to treat water at the “Point of Entry” (POE) or “Point of Use” (POU).
| Feature | Whole House (POE) | Under-Sink / RO (POU) |
|---|---|---|
| Coverage | Every tap, shower, and appliance | Usually just one kitchen tap |
| Primary Goal | Protect plumbing and skin | High-quality drinking/cooking water |
| Install Difficulty | Intermediate (requires main line cutting) | Beginner (connects to existing valves) |
| Maintenance | Media lasts 5-10 years; pre-filters 6-9 months | Cartridges replaced every 6-12 months |
There are many benefits of home water filtration systems, ranging from appliance longevity to better-tasting coffee. For many of our neighbors in New Braunfels and Buda, a combination of a whole-house sediment filter and an under-sink RO system provides the ultimate protection.
Before you start your water filtration system install, gather your “battle gear.” Nothing halts a DIY project faster than a missing wrench when the main water is already shut off.
The DIY Toolkit
- Tubing/Pipe Cutter: For clean, square cuts on copper, PEX, or PVC.
- Adjustable Wrenches: You’ll likely need two, one to hold the fitting and one to turn the nut.
- Teflon Tape (PTFE): Essential for sealing threaded connections. Wrap it 2-3 times clockwise around the threads.
- Drill and Bits: You may need a 1-1/4” bit if you’re installing a new dedicated faucet through a countertop.
- Bucket and Towels: To catch the “oops” water that stays in the lines after shut-off.
- Pressure Gauge: To ensure your home’s pressure is within the system’s operating range (usually 25-80 PSI).
Safety and Compliance
One often overlooked step in Central Texas homes is electrical grounding. If you have copper pipes, they often serve as the electrical ground for your home. Installing a plastic filter housing breaks that continuity. You must install a jumper cable (a copper wire clamped to the pipe on both sides of the filter) to maintain safety.
Also, consider the dangers of hard water. If your water is extremely hard, it can clog a fine filtration system quickly. You might need to install a softener upstream of your carbon filters to keep the system running efficiently.
Step-by-Step Guide to Under-Sink and Whole House Installation
Whether you are going for a focused under-sink unit or a comprehensive whole-home setup, the logic remains similar: intercept the water, clean it, and send it back on its way.
Under-Sink Installation (The Beginner-Friendly Choice)
- Clear the Area: You’ll need about 2 square feet of space under the sink.
- Shut Off Cold Water: Turn the dedicated valve under the sink clockwise. Open the faucet to bleed off pressure.
- Install the T-Adapter: Disconnect the cold water line and install the T-adapter provided with your kit.
- Mount the System: Use the provided template to screw the filter bracket to the side of the cabinet. Ensure there is enough clearance below to unscrew the canisters later.
- Connect Tubing: Measure your plastic tubing, cut it squarely, and push it into the “Quick-Connect” fittings until it seats.
- Install the Faucet: If your system has a dedicated tap, install it in an existing soap dispenser hole or drill a new one.
- Flush: Turn the water back on slowly. Check for leaks immediately and again after two hours. Flush the system for 10 minutes to remove “carbon fines” (black dust).
For those looking for a deeper dive into the most popular POU option, understanding what reverse osmosis installation offers can help you decide if the extra steps (like installing a drain saddle) are worth the purer water. You can also refer to this water filter installation guide for specific under-sink nuances.
Locating the Best Spot for a Whole House Water Filtration System Install
A whole-house water filtration system install is a bigger commitment. You need to find the main water line before it branches off to the water heater or other fixtures.
- Proximity to Main Shut-off: Install the system as close to the entry point as possible, but after the main shut-off valve.
- Bypass Loop: We highly recommend installing a three-valve bypass. This allows you to divert water around the filter if you ever have a leak or need to do maintenance without losing water to the whole house.
- Sequence Matters: Typically, you want a sediment pre-filter first to catch dirt and rust, followed by the main media tank (carbon or KDF), and finally a post-filter or UV light.
- Environmental Protection: In Central Texas, we don’t worry much about freezing indoors, but if you’re installing in a garage or shed, ensure the system is protected from the rare Texas freeze and direct sunlight, which can cause algae growth in clear housings.
For a detailed look at high-capacity systems, the whole-house water system installation guide offers excellent technical specifics. Many homeowners also choose to pair these with water softener filtration systems to handle both contaminants and scale in one go.
Maintenance, Troubleshooting, and Professional Support
Even the best water filtration system install requires a little TLC to keep the water tasting crisp.
Maintenance Schedule
- Sediment Pre-filters: Every 6–9 months. If you notice a drop in water pressure, this is usually the culprit.
- Carbon/RO Cartridges: Every 6–12 months.
- Main Media Tanks: High-quality tanks, like those from SpringWell or Aquasana, can last 1,000,000 gallons or up to 10 years.
- UV Bulbs: Usually replaced annually as the light intensity fades.
Troubleshooting Common Issues
- Low Water Pressure: Check if the pre-filter is clogged or if you have a kink in the tubing.
- Cloudy Water: This is often just trapped air after a filter change. Run the water for a few minutes; it should clear up.
- Leaks at Fittings: Most leaks happen because the tubing wasn’t cut squarely or pushed in far enough. Re-cut and re-seat the line.
At Woods Comfort Systems, we know that cutting into your main water line can be intimidating. If you find yourself staring at a pile of pipes and feeling overwhelmed, our water softener installation and service team is always ready to step in. We’ve seen it all, from backwards-installed filters to “handyman” leaks that caused major damage. Sometimes, knowing the 9 signs you need a water softener installation ASAP is just as important as knowing how to do the work yourself.
Frequently Asked Questions
Will a water filtration system install reduce my home’s water pressure?
Generally, no, provided you size the system correctly. Most whole-house systems are rated by Flow Rate in Gallons Per Minute (GPM). For a home with 1-3 bathrooms, a 9 GPM system is standard. Larger homes (4-6 bathrooms) should look for 12-15 GPM. If you experience a pressure drop, it’s usually due to a saturated sediment filter that needs replacing.
How often do filters need to be replaced?
It depends on your water usage and quality. In our Central Texas service area, heavy sediment can mean changing pre-filters every 6 months. The main carbon media in a whole-house tank typically lasts about 10 years or 1 million gallons. Under-sink RO membranes usually last 2-3 years, while the individual carbon blocks should be swapped every 6-12 months.
Is DIY installation feasible for beginners?
Under-sink systems? Absolutely. They are designed for the average homeowner with basic tools. Whole-house systems? These require intermediate skills, including the ability to cut and join pipes (soldering copper, crimping PEX, or gluing PVC). If you aren’t comfortable working on your main water line, it is always safer to consult a professional to ensure your warranty remains valid and your home stays dry.
Conclusion
A successful water filtration system install is a gift to your future self. From the first sip of clean, chlorine-free water to the peace of mind knowing your appliances are protected from sediment, the effort pays off every single day.
Remember to test your water before you start to ensure you’re buying the right technology for your specific needs. While DIY is a great way to save a few hundred dollars in labor, don’t hesitate to reach out for professional help if the project gets complex. Whether you’re in San Marcos, Austin, or San Antonio, we’re here to help you achieve the best water quality possible.
For expert advice or professional installation, visit Woods Comfort Systems Austin TX or give us a call. We’ve been treating Central Texas families like royalty for over 60 years, and we’d love to help you make your home’s water the clear choice.
Whether you require installation, repair, or maintenance, our technicians will assist you with top-quality service at any time of the day or night. Take comfort in knowing your indoor air quality is the best it can be with MOE heating & cooling services Ontario's solution for heating, air conditioning, and ventilation that’s cooler than the rest.
Contact us to schedule a visit. Our qualified team of technicians, are always ready to help you and guide you for heating and cooling issues. Weather you want to replace an old furnace or install a brand new air conditioner, we are here to help you. Our main office is at Kitchener but we can service most of Ontario's cities
Source link